An Introduction to CDI-ICM
May 9, 2018
During the recent Homebuilding and Renovation Show at the NEC in Birmingham Chris was able to get in front of a camera and give an introduction into CDI Innovative Construction Materials and explaining what we are all about and how our systems can benefit peoples projects in a number of different ways.
In the 5 minute interview Chris discusses what we specialise in and in what type of building these are suited to. He discusses how our systems benefit new build and renovations and how they help improve acoustic and underfloor heating performance as well as having many other key benefits.
Chris talks about how removing timber floors and introducing a concrete floor upstairs allows a floor to be stronger, less squeaky, more solid, higher performing and allows you the maximum choice when it comes to design and options on floor finishes.
More Exhibitions Coming Up!!
May 9, 2018
With Ecobuild and the Homebuilding and Renovation Show all done and dusted along with the first show at the National Self Build & Renovation Centre we’ve had a few weeks to reflect on good they were for us. The number of people we came into contact with and the general high level of discussions regarding projects from very small to very large has meant the weeks since these show we have been extremely busy.
It’s was great that each time a show ended we returned to the office with a good number of leads and a number of people already sending us information on projects they were working on. In fact in the 6 weeks since the end of the NEC’s Homebuilding and Renovation Show we’ve already supplied Lewis Deck to 2 projects and a third is due to be sent out any day.
Along with these “live” projects it was great to talk to people who are just starting out on their journey into the realm of building their own property or doing work renovating their current ones. We look forward to keeping in touch with everyone over the coming months and probably next few years while these plans and ideas turn into reality.
Creaky wooden floors
October 19, 2017
We often talk to visitors at exhibitions about the issue of noisy floors, usually the issue of squeaky wooden floors, whilst our systems are often used to provide the fire and acoustic separation in an apartment situation, it is creaks and squeaks in a traditional timber boarded 1st floor that self-builders are keen to avoid.
No matter how well built a chipboard, plywood or tongue and groove floorboard floor is installed, screwed and glued, it is a system that includes many joints and a medium (the wood) that will have a moisture content and will shrink as it dries out. All the board systems have a limited spanning capability and therefore if a single joist develops some movement, there will be movement in the boards above leading to noise and that usually means a squeak or creak that is difficult to do anything about, not to mention that soft spot in the floor where the flex occurs. Just a little annoyance that can take the edge off an otherwise extremely well finished house.
Our floor systems and typically the Lewis Deck for self-build projects, provide floors that end up being jointless for most projects, they also span much further than the joist centres that they are used with and therefore, even if a timber joist could move below, it is unlikely to as the deck will carry the loads to the joist either side and in most cases a number of joists either side. This gives a very solid feel to the floor and removes the issue of creaky and squeaky wooden floors.
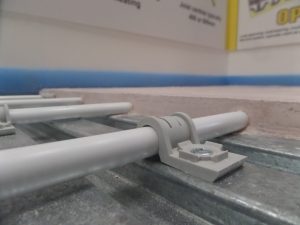
The Lewis Deck, with either a liquid screed or a concrete installed over the top is usually 50mm in depth, this can be reduced to 36mm if required and this suits some refurbishment projects where the extra height can be an issue. We also have the Max4 system where build-up heights are at an absolute premium and can be installed at just 15mm. These system thicknesses can also include underfloor heating pipes.
CDI Added to Updated Sourcebooks
August 30, 2017
It’s always good to get a little more advertising in. From today we are now listed in both Real Homes and Period Livings updated sourcebooks.
You can find us at both through the following links:
Travertine wetroom by Craig Bills
May 30, 2017
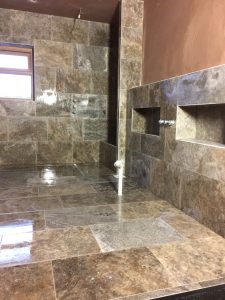
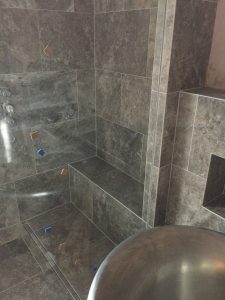
Craig Bills is a master tiler and has been installing wet-rooms using Lewis Deck and concrete for over 20 years, he is a passionate advocate for the Lewis Deck system in wet-rooms and bathrooms as it give an opportunity for the floor to be 1 piece of waterproofed concrete. This makes a very robust and easy to build wet-room floor and is suitable for the most fragile of tiles including stone, porcelain, marble, ceramic or in this case Travertine without the danger of the floor deflecting under the load of either the bath or the occupants, etc and the tiles cracking.
For more information regarding Craig’s work and to contact him, please visit his page: Click here for Craig’s website

We’ve a new model down at Swindon!
May 18, 2017
One of the great benefits that you get from introducing Lewis Deck into a residential development is the option to install a wet room floor into bathroom/ en-suite areas with extreme ease compared to other flooring systems as well as maintaining one solid concrete slab in the room reducing the possibility of leaks from a number of different materials being used to create the floor.
When we talk about the benefits of what Lewis brings to a project this seems to be one of the benefits that seems to get lost in conversation with people generally wanting the acoustic or solid floor improvements before anything else. However, over the last few months (with us spending a lot of time at trade shows) both myself and Chris have been having more and more conversations with people looking to add that little bit extra to their bathroom areas by having wet rooms rather than traditional bathroom and shower areas.
This posed us a bit of a dilemma, how do we get the point across to people that Lewis is the material of choice when it comes to thinking about upper floor wet rooms.
The answer, Swindon.
As has been mentioned in a number of different places on this website we have a permanent stand at the National Selfbuild and Renovation Centre in Swindon.
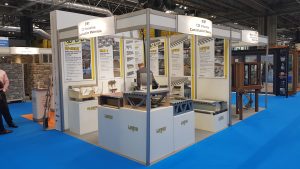
This is it!!
 (and this is what the stand looked like last week)
Stand E171 was, once upon a time, shared between ourselves and Gyvlon, the screed manufacturer. Earlier this year however, Gyvlon decided that they no longer wanted to share the stand so we took over the whole (even though it’s only small) thing!
With us being based in the north east we needed a reason to go down to Wiltshire and replace the bottom model with something new so this was the perfect time, and the perfect reason, to go down and update what we have down there.
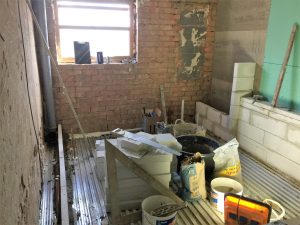
So, a couple of weeks ago we set the plan into motion. First of all we needed old timbers to replicate joists in a house. Chris found the local timber reclamation yard and off we went to pick up a few bit of wood from it. When we got there it was closed!! Who knew Google told you when businesses were open and closed!
We eventually got going and over the next week or so the new model started to take shape.
One of the things that we wanted to do with this new model was show people how easy it is to install a drain into the Lewis and then create the falls to allow the room to function as it should. With that in mind below you’ll see a number of photos showing you how easy it is to install a drain into Lewis then create the falls!!
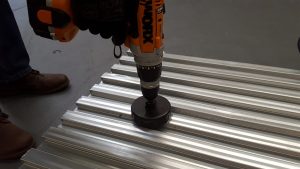
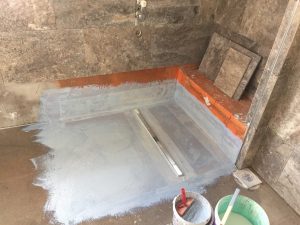
Firstly cut a hole through the steel deck large enough for the waste pipes to fit through. I say large enough seen as though the first time we did it the hole was just too small!
At this point the waste pipe can be inserted into the deck and the drain fixed into position within the drain as below.
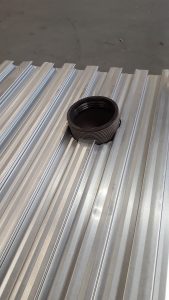
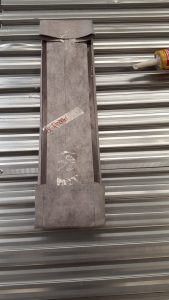
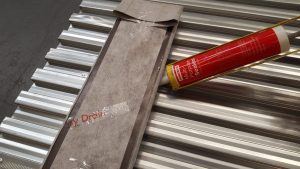
Once the drain is in place ensure that the whole connection is sealed and that the hole that was cut into the steel is also sealed completely. This then ensures that no concrete screed leaks through any gaps when it is poured.
Homebuilding & Renovation Show
March 23, 2017
The end of March saw us attend our 2nd exhibition of the month. This time at the Homebuilding & Renovating Show held at the NEC in Birmingham.
Our longest show of the year, and one that we’ve attended for the previous 6 years, is the first Homebuilding show of the year. It also seems to be getting bigger and bigger as the years go on. This year was no exception. For those of you who know the NEC this years event was held in halls 9, 10, 11 and 12 and lucky for us we seem to be right slap bang in the middle of it at the edges of halls 10 and 11.
As this is an exhibition more tailored to the self builder/ contractor, as oppose to the design team like Ecobuild is, this show allows us to focus more on our core business products of Lewis Deck and Lacomet rather than our more commercial grade systems, it also means we don’t have to lug that massive Op-Deck display model around like we did down in London.
This year as well we were able to have our new 36mm thick screeded floor with underfloor heating system on display for the first time at one of these exhibitions. Ideally suited for renovation projects where there are issues with beam strength and also floor to ceiling heights, it provides floors with a stronger alternative to traditional heated upper floor systems. We are still running through the R&D process with the help of Teesside University, but it was great to see it on display and having people asking questions about it.
We also had this new website launched in between Ecobuild and this show so both myself and Chris were directing people to it as much as we could.
Ecobuild 2017
March 16, 2017
March is always a busy time for us. Not only is it a lot of companies end of year (so we seem to get inundated with last minute orders!) but it’s also our busiest month when it comes to trade shows, and it begins with the biggest one we do, Ecobuild.
Ecobuild, held at Londons EXCEL arena, is the leading exhibition and conference for construction, design and energy in the built environment, attracting over 33,000 high calibre, senior level decision makers and influencers from architects and developers, to local government and major infrastructure clients (their words not mine).
As for all of the exhibitions that we do the logistics of getting us there always prove to entertaining and there’s always something that either gets forgotten or lost as we transport 7 or 8 models and displays from our warehouse down to the capital. This year we’d even left it late to book a hotel for us to stay in! Fortunately we were still able to get into the hotel we’ve stayed at over the last couple of years.
So on the Monday before the show I’m up at the crack of dawn and drive up to the office from where I live down in Lancashire. By mid morning we’ve picked the van up and after some fun and games getting the displays into the van we are set and ready to go just before noon. Each year we select one of our systems that we want to have as the focal point for the show. This year we decided that our Op-Deck system was to be the one that we’d focus on. So in the run up to the show we had a cracking new model made on a much bigger display box than we have had in the past. Sounds good I hear you say! Yes, but as this system is topped off with a nice section of concrete we’d completely forgotten (and by that I mean hadn’t even considered) how heavy this thing was going to be! Watching 3 (oldish) blokes trying to pick this thing up and put it into the back of a transit van was a thing of comedy gold.
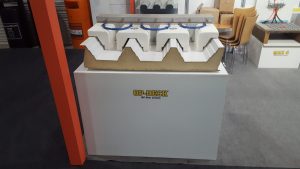 Our new Op-Deck model in place (eventually).
Anyway, following a quick bite to eat we were off heading south on the A1 on our 250 plus mile journey to the Docklands. Fortunately for me Chris decided he was driving as I’d done a 2 hour drive already that morning.
As far as journeys go it was pretty uneventful and we were down and ready to unload for around 5.30pm (this included our traditional taking the wrong lane on the last roundabout before getting to EXCEL).
Now for the fun part, how the hell do we get the Op-Deck model out of the van when we are a man down?? After a bit of quick thinking from me I managed to persuade a forktruck driver to give us 30 seconds of his time and lift said (heavy) display down for us, in the process saving us a good half hour of messing around and potentially dropping the thing and destroying it.
So with that taken care of we were all done and dusted and ready for the start of the show by 7pm. So after dumping the van at the EXCEL we were off on the tube across to Greenwich to our hotel.
Lewis Deck and Underfloor Heating
February 28, 2017
Introduction
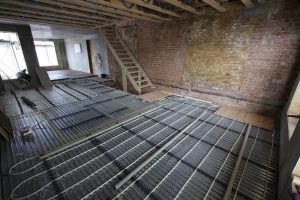
The Lewis Deck system provides solutions for acoustics, fire, high loads, underfloor heating and wet rooms, it can achieve all of these simultaneously with relatively simple build ups. All of these aspects will be touched on, but this paper sets out to discuss the case for concrete/screed floors with underfloor heating “upstairs.”
This is a system that allows the introduction of a suspended lightweight concrete or screed floor into the upper floors of buildings on top of beams or joists.
Lewis Deck – the system
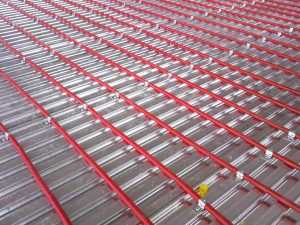
Lewis Dovetailed metal decking is a steel sheet that is rolled to form a dovetailed profile, this is then used to span over the top of joists and a concrete or screed is then poured on top. The Lewis® acts initially as permanent shuttering for the concrete, being able to bear the weight up to some reasonable joist centres, however, once the concrete has cured the Lewis Deck then acts as reinforcement. This composite action that gives the system many of its advantages including loadbearing and stiffness for such a thin concrete construction, just 50mm in most situations.
For acoustic floors it is simply a case of isolating the Lewis Deck and concrete from the joists and surrounding walls by the use of a simple resilient strip, the strip also acts as the expansion joint around the edge of the floor. The Lewis Deck system has been used in many acoustic separating floors including new-build and conversion, from standard domestic apartments to music venues under apartments, recording studio floors, cinema floors and just where the added value of a very quiet floor is desired.
The fire solution is a combination of the overall build up and has been tested up to 120minutes, therefore suitable for many applications.
For wet-rooms it is simply a case of using a suitable concrete and an appropriate simple floor to wall edge detail. Falls and drains can also be built-in for that true wet-room experience.Note: concrete/screed from this point on will be referred to as simply concrete, but the term concrete or screed can be used interchangeably within this document)
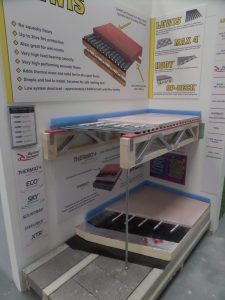
The video compares the Lewis Deck and Thermio+ screed (top left) against aluminium spreader plates (top right). On the bottom the comparrison is a typical ground floor showing the Thermio+ screed (bottom left) against concrete (bottom right).
Another mention in the house building press
February 28, 2017
The Lewis Deck has been picked up by a number of magazines over the years, here is the latest mention in a discussion about underfloor in the Real Homes Magazine:
Underfloor heating: your questions answered
Thinking of installing underfloor heating? Real Homes has posed your most-asked UFH questions to industry experts
Wet vs dry systems
As electric systems are installed directly under the floor covering, and work independently from your central heating system, they are particularly useful for one-room installations or where the sub-floor level is already set. The wire or matting systems are very thin (around 3mm) and shouldn’t cause problems with differing floor levels – thus creating little disruption to the existing room.
Wet systems circulate warm water through plastic pipes installed underneath the floor and are connected to the main central heating source. This system tends to work best when the pipes are embedded in a screed, as this helps dissipate the heat, so it is suited to new floor constructions where the sub-floor can accommodate the pipework and cement screed. Wet systems are therefore more likely to be used in new-builds and extensions or during major renovation work.
Efficiency
Wet underfloor heating (UFH) systems generate temperatures of around 40°C to 65°C, meaning that the actual floor temperature will be on average between 23°C and 32°C. This is actually lower than a standard radiator, so your household heating costs should be reduced over time.
Ease of control
Specialist UFH controls are vital to ensure comfort, responsiveness and energy efficiency. UFH takes longer to heat up and cool down compared to radiators, so to overcome this time lag, programmable controls are essential.
For households with irregular or limited occupancy and for holiday homes, it is useful to have remote control so that you can turn it on an hour or two before arriving. Remote control is also useful if you forget to turn the heating off.
Getting the right insulation
Underfloor heating will always be more efficient and cost-effective when fitted above insulation, as this reduces downward heat loss and forces heat up into the room where it is wanted. In new-build homes and extensions, floor insulation will be incorporated to meet Building Regulations, while on refurbishment projects insulation can usually be added.
Taking up existing floorboards to add insulation between the joists is fairly straightforward. Adding insulation to a concrete screed floor, however, will mean that the height of the floor is increased so skirting boards and doors will have to be adjusted accordingly. We always recommend speaking to a reputable company, as they will be able to offer advice based on the individual characteristics of your home.
Choosing flooring
Solid floors, including stone, porcelain, ceramic, terracotta and slate are ideal, as they tend to have great thermal conductivity and will provide good heat output when it comes to underfloor heating. If you prefer timber flooring, always check with your supplier to ensure it is suitable for use with underfloor heating, or consider engineered timber boards that, due to their construction, tend to be more stable during changes in temperature.’
In both cases, bear in mind that temperatures shouldn’t exceed 27°C. Most top-of-the-range laminates can also be used with underfloor heating, as can all carpets — although you may find heat output is slowed down a little, due to the combination of carpet and underlay.
Potential faults
The main cause for concern for many prospective buyers of warm water underfloor heating is what to do if the pipes leak. However, unless a nail is accidentally put through them at some stage, this simply does not happen. There are no joints in the floor and the various pipes used are designed and tested to have a 50-year life expectancy at temperatures and pressures that exceed those required by the system.
If accidental damage should occur, then individual pipes can be pressure tested to locate the correct one. In timber floors, the pipe can usually be exposed to allow for repairs, while screed floors will need to be excavated to uncover the pipe.
Choosing the right system
It’s particularly effective for large open-plan spaces – particularly those with high ceilings – as the entire floor radiates heat upwards so you benefit from warm feet and even room temperatures. This radiant heat also means reduced draughts, moisture levels and airborne allergens.
Typically underfloor heating is more than enough as a stand-alone form of heating. However, its capabilities will often be dictated by other factors, such as floor coverings and a building’s insulation levels (especially walls and windows). This is why heat-loss calculations are so fundamental, as having looked at a building’s individual thermal performance they will tell you how much heat you need to generate.
For example, a poorly insulated room with lots of glazing may not heat fully when it is cold outside (which means additional insulation or supplementary heating may be necessary). Floor coverings also play an important role. Normally, stone and tiles are excellent options, as are carpets with suitable tog ratings. If you’re keen on timber, however, remember it has a lower temperature tolerance.
Underfloor heating vs radiators
Where cost is an issue, the expense of installing underfloor heating may outweigh the advantages, especially if it involves removing concrete floors and re-screeding. In houses not occupied during the day, underfloor heating’s slow warm-up and cooling time (which can be up to four to six hours) may not suit you.
‘A combination of both systems can often be the best answer for many homes, as radiators can be easily incorporated into an underfloor system. A good compromise is to install underfloor heating on the ground floor, with radiators upstairs to accommodate the different requirements for living and sleeping spaces, especially as many people still want heated towel rails in their bathrooms.’